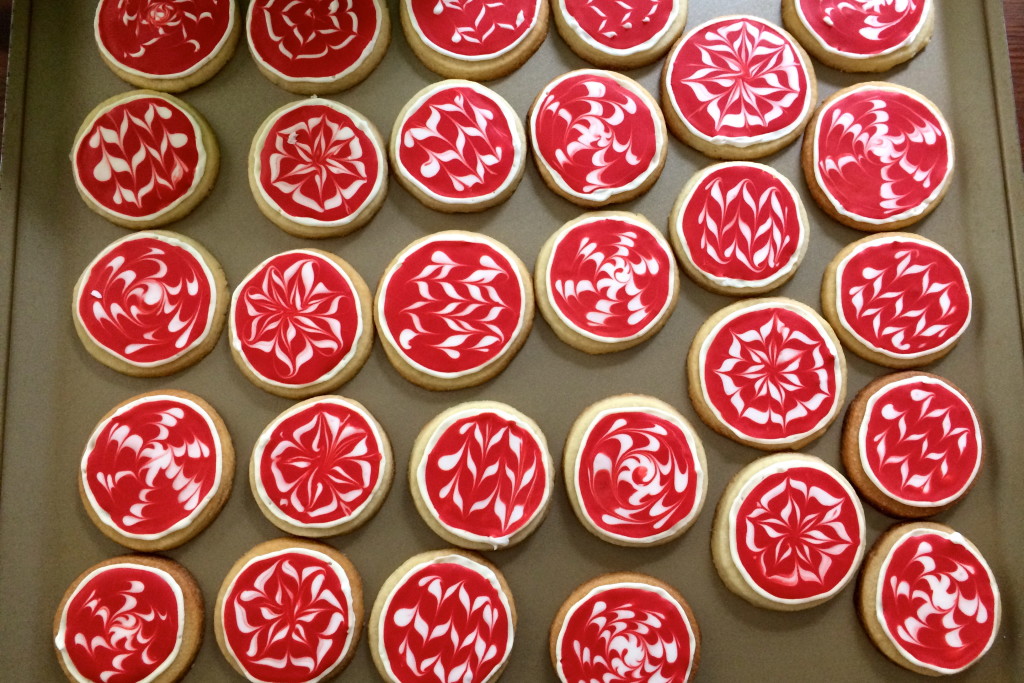
I had very grand plans for Christmas cookies this year. But, as usual, work and life got in the way. I’m hoping to make a few more batches in the next week, but in the meantime, I wanted to share the cookies I have managed to make so far.
The first are these sugar cookies that look very fancy but aren’t nearly as difficult to make as they look.
You start by making sugar cookies, of course, and I’m pretty partial to the recipe below (which doesn’t require chilling before rolling out). I used a biscuit cutter to cut them into circles, baked them just until starting to get golden around the edges, and let them cool while I made the royal icing.
The royal icing is a little fussy, because you have to be pretty precise with the measurements and whip the heck out of it until it’s the right consistency. You’ll also need piping bags and piping tips (for each color you’re using). But you’ll use the firm white icing to pipe edges around the cookies, then thin out the white and other colors for filling in and making the designs. I was making Naval Academy goat cookies at the same time as these, so I split the icing into several parts to have blue, gold, red and white. You could easily do red, green and white, for more variety.
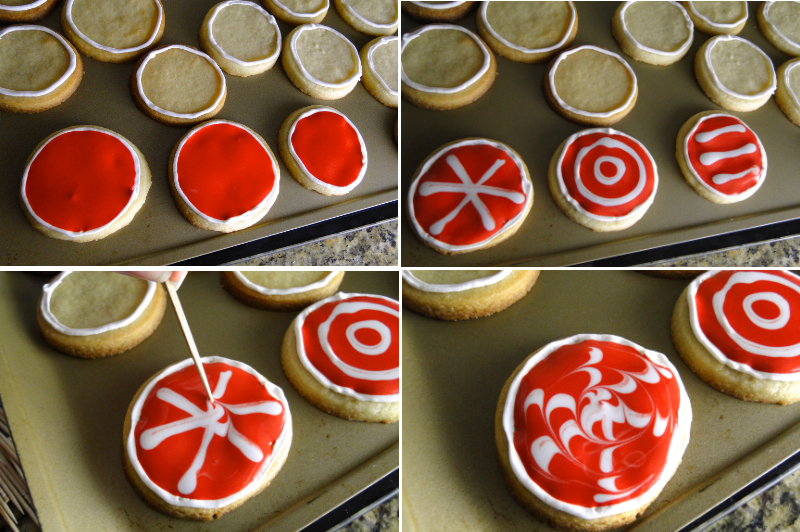
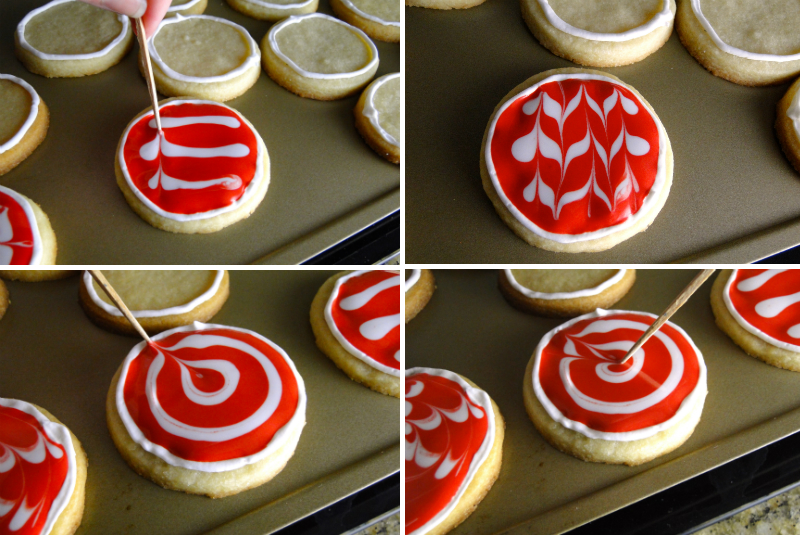
And all that pretty marbling? You do it with a toothpick. You don’t even need to draw totally straight lines — just pipe something on there and drag a toothpick in a circle or up and down, and let it dry. I’ve demonstrated a few different patterns, but you can experiment with your own, too.
As you can see, the process is not as involved as you might think from looking at them. But they do take a fair amount of time. If you’ve never baked any kind of cookies before, you may want to start with something a little less time-intensive (like chocolate chip, or sugar cookies with sprinkles). But if you’re looking for something new that will impress your family and friends, try this out! And let me know how they turn out.
Christmas ornament sugar cookies (Makes 3-4 dozen cookies)
2 sticks (1 cup) unsalted butter (set it out on the counter for about 30 minutes before you start)
1 1/2 cups sugar
1 egg (at room temperature is best)
2 teaspoons vanilla extract
2 3/4 cups all-purpose flour
1 teaspoon baking powder
1 teaspoon salt
Preheat oven to 400F and make sure you have a clean surface ready for rolling out the cookie dough. Line two or three baking sheets with silicone mats or parchment paper.
Using the paddle attachment on a stand mixer (or using a hand-held electric mixer and a large mixing bowl), beat/cream together the butter and sugar until it looks light and fluffy. Beat in the egg and vanilla. In another bowl, sift together the flour, baking powder and salt.
Add the flour mixture to the butter mixture about a third at a time, mixing just to combine after each addition. Don’t chill the dough. Gather together about half of the dough and place it on a clean floured surface and roll it out to about 1/8-inch thick (a little thicker is fine). Cut out circles or shape of your choice using a biscuit cutter or cookie cutter dipped in flour. Place the unbaked cookies on the prepared cookie sheets.
Bake cookies until they’re just starting to get golden around the edges, about 6-7 minutes. Remove from oven and cool on pan for a minute or two, then move to a wire cooling rack to cool completely.
Royal icing (Makes more than enough to decorate the results of the above cookie recipe)
1 pound powdered sugar
4 teaspoons powdered egg whites (not reconstituted)
1/3 cup water
1 tablespoon lemon juice
1 teaspoon vanilla
Food coloring gel (I used Americolor super red – you can get food color gels at Michael’s, cake decorating stores, or online)
Place the powdered sugar and powdered egg whites in the bowl of a clean bowl of a stand mixer fitted with the paddle attachment. Mix on low speed to combine.
Put the water, lemon juice and vanilla in a measuring cup (you don’t have to stir them), and pour into the powdered sugar mixture with the mixer still on low speed.
Once the ingredients are combined, increase the speed to high and beat the icing, scraping down sides of bowl occasionally, until it holds medium peaks (this will take about 3 minutes in a stand mixer or 10ish with a handheld). Separate the icing into two or three bowls (depending on how many colors you’re planning to use). Keep one white, and immediately spoon it into a piping bag with a small, plain tip (I usually use Wilton #3). Add red and/or green food coloring gel to the other bowls, to dye them the desired colors. Keep in mind that the color will darken a bit when the icing dries.
To thin the icing for flooding/spreading: Add water about a teaspoon at a time to icing that is already the desired color. Stir after each addition, adding water until the icing is roughly the consistency of maple syrup. It shouldn’t be super runny, or it will be hard to work with. You can test it by pulling the spoon up a bit and seeing if the stream of iciing from the spoon disappears back into the rest of the icing after a few seconds, or stays distinct. You don’t want it to disappear immediately, but it should sort of melt into the rest of it after a few seconds. Once the colors and icing is the right consistency, carefully put them in piping bags with small-ish plain tips, and put caps on the tips so the icing doesn’t go everywhere.
TO DECORATE: Set the cooled cookies out on cookie sheets so you’ll be able to move them later. Use the thick white icing to outline each cookie, then put the white icing back in a bowl and thin it to the same consistency as the red and/or green.
Working 3-4 cookies at a time, fill in the outline with red, white or green “flood” icing. Then use a different color to draw some kind of lines on the cookies, and drag a toothpick back and forth or in a circle to make a marbled pattern.
Let the icing dry overnight before storing the cookies in an air-tight container or serving.


Love these and PS- LOVE the new layout!