Since this is our last spring in DC (at least for a while), we knew we had to go see the cherry blossom trees when they were in bloom. Unfortunately, that’s easier said than done. The peak blooming time is very hard to predict, the trees really only bloom for a week or two, and nearly every person in the world seems to descend on DC during that general time frame in a desperate attempt to see the pink blossoms.
Still, it’s totally worth the effort.
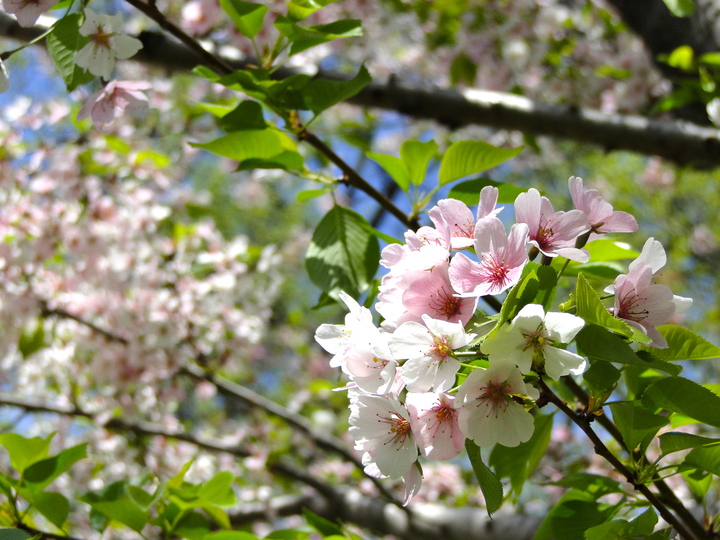
The first time we took a stroll around the tidal basin at cherry blossom time — two years ago — I was inspired to bake cookies and decorate them to look like the flowers. My mom really loved the cookies, so I thought they’d be a good addition to the care package I recently sent after she broke her arm.


I actually used a different cookie recipe this time, and it was awesome because it took less time and made less mess but was just as delicious as the other recipe. Score. Decorating them does take quite a while, though.


So, if you’re craving some cookies that taste like brownies with a hint of cinnamon, you can bake these and leave them undecorated. They will still be delicious, and people will still be wicked impressed. I promise.

But, if you have a lot of time on your hands, the decoration is very pretty and not as hard as you might expect.


This is much easier with a stand mixer, but you should be able to do it with a hand-held mixer if you don’t have a stand mixer. The key is beating the powdered sugar, water and powdered egg white mixture for several minutes — until it gets glossy and stiff (sort of like a meringue). You put some of that in a piping bag and outline the cookies…

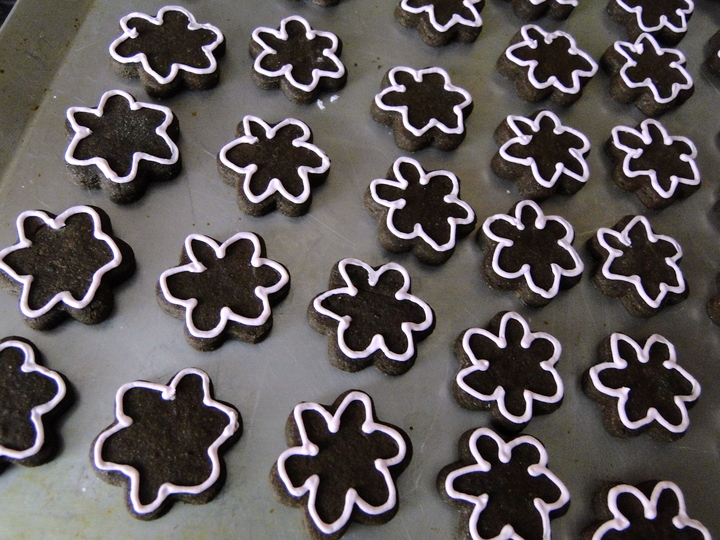
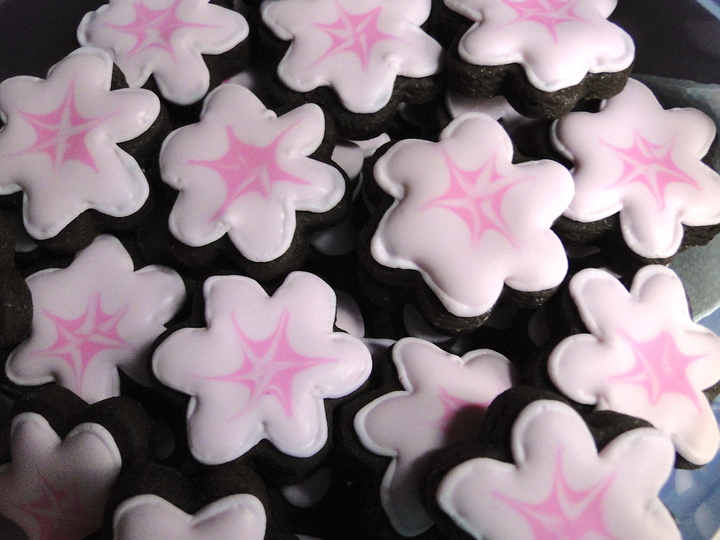
I obviously am not a pro outliner, but it’s fine if they are a little uneven. While the outlines are drying, I add some water to the icing to thin it out. The consistency of the icing should be something like maple syrup. You use that to fill in the cookies, working a few at a time (I use a little paintbrush-like thingy or a teaspoon to spread it out).


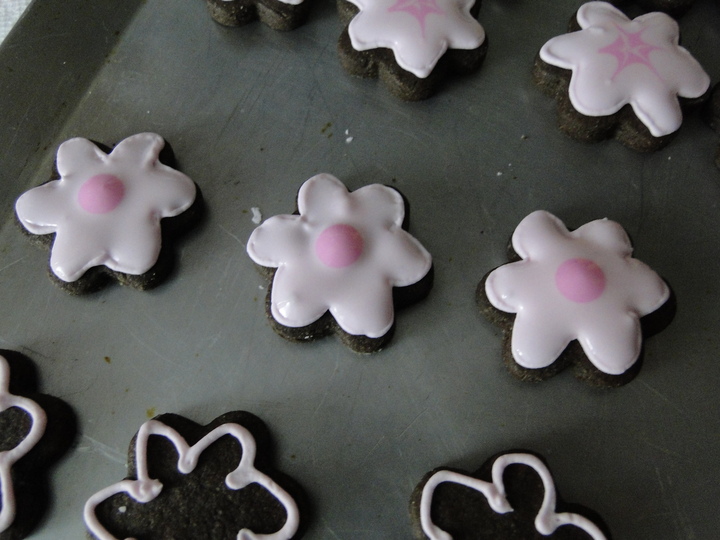
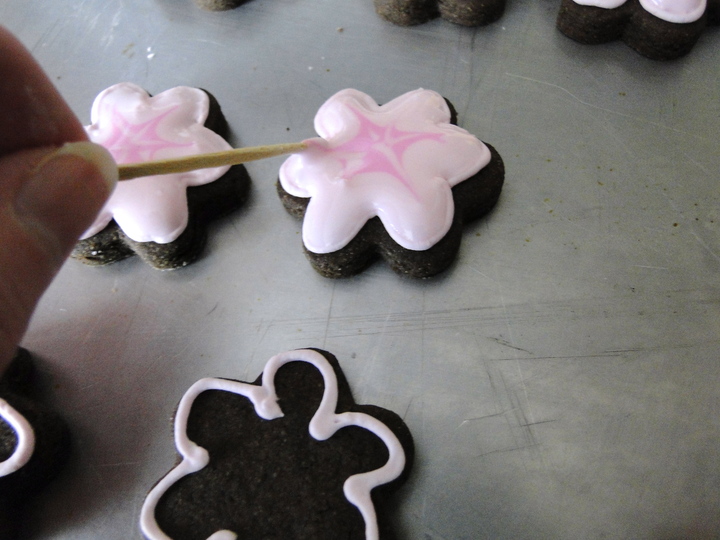
You’ll also want to have a bit of the thinned icing with a few extra drops of pink food coloring ready in another piping bag, so you can drop pink dots in the center of the cookies you just filled in, while they’re still wet. Leave them like that or stick a toothpick in the center of the pink dot and gently drag outwards toward each petal to make that star-like design.
See? You can totally do this. After they’re decorated, leave them out overnight to dry. Then store in an air-tight container until they’re all eaten. Just be warned: They’re addictive!
Chocolate-cinnamon cherry blossom cookies (Makes at least 100 tiny cookies, adapted from The Smitten Kitchen Cookbook)
3 cups all-purpose flour (plus more for rolling)
2/3 cup unsweetened cocoa powder
3/4 teaspoon salt (table salt is fine)
1/2 teaspoon baking powder
1/2 teaspoon cinnamon
2 sticks unsalted butter (let the sticks of butter sit out on the counter at room temperature for at least an hour beforehand, but don’t microwave them or otherwise melt the butter)
1 1/2 cups sugar
2 large eggs
1 1/2 teaspoons pure vanilla extract
Icing (optional — recipe below)
Measure the flour by spooning it into a dry measuring cup and then gently dragging a knife across the top to level — don’t smoosh it down into the cup or use the measuring cup to scoop it.
Pour the measured flour, cocoa powder, salt, baking powder and cinnamon into a medium mixing bowl. Use a whisk to stir and combine the dry ingredients. Set aside.
Place the butter and sugar in the bowl of a stand mixer fitted with the paddle attachment (pictured above) or in a large mixing bowl (if using a hand-held electric mixer instead). Beat the butter and sugar together for several minutes, starting at a low speed to combine them and then increasing to a medium or medium-high speed. Keep beating until the mixture is a lighter color and it looks fluffy.
Add one egg and beat for a few seconds to combine. Use a spatula to scrape down the sides of the mixing bowl, then add the second egg and beat again to combine. Add the vanilla and beat for about a minute, until the mixture looks homogeneous.
Gradually add the flour-cocoa mixture to the butter-egg mixture and mix just until the ingredients look combined (I do this by adding about a third of the dry ingredients and turning on the mixer for about 20-30 seconds, just until the flour and cocoa look wet, then adding another third and so on. Don’t add the whole dry mixture at once or the mixer will make the flour and cocoa explode up onto you and your kitchen counter).
Divide the cookie dough into two roughly equal parts and wrap each well with plastic wrap (I usually shape the dough into rounds and sort of smoosh them down inside the plastic). Refrigerate the dough for at least an hour, but overnight is fine.
When ready to bake the cookies, line two or more cookie sheets with parchment paper or silicone baking sheets. Preheat the oven to 350F. If the cookie dough has been in the fridge overnight, let it sit on the counter for a few minutes.
Prep a flat workspace (such as the kitchen counter) by making sure it’s clean and then dusting it lightly with flour. Unwrap one of the cookie dough rounds and place it on the floured surface. Dust a little flour over the surface or rub some flour on the rolling pin.
Roll the cookie dough out to about 1/4-inch thickness and cut using a cookie cutter (I used a 1.5-inch flower cookie cutter that came in a Wilton set). Place about 1 inch away from each other on prepared cookie sheets and bake about 8 minutes, or until the edges are firm and the centers are a bit puffed.
Remove the cookies from the oven, allow to cool for a few minutes, then transfer to a wire cooling rack until cool.
Royal icing (makes more than enough to decorate the cookies)
1 pound powdered sugar (also called “confectioners sugar”)
4 teaspoons powdered egg whites (usually available with the baking supplies)
1/3 cup water
1 tablespoon lemon juice
1 teaspoon vanilla
food coloring gel (I used Americolor “deep pink,” but any pink will work)
2 piping bags (I use the disposable kind), 2 tips, 2 couplers and 2 rubber bands
Toothpicks
Prepare two piping bags. One is going to be for outlining, so use a relatively small tip size (Wilton #2 or #3 are good — bigger is a little easier to use, I think). The other one is going to be for making the darker pink dots in the center of the cookies. Set all the cookies out on clean cookie sheets.
Place the powdered sugar and powdered egg whites in the bowl of a stand mixer fitted with the paddle attachment. Gently pour the water, lemon juice and vanilla into the bowl, trying not to pour on top of the powdered egg whites (I’ve had issues with this in the past for some reason).
Turn the mixer on low speed until the powdered sugar is all wet, then turn up to medium or medium-high speed and beat for a few minutes, watching after the first minute or so until the mixture gets past the liquidy phase and looks glossy and firm. (You may need to scrape down the sides of the bowl at some point to get everything well combined). You can check whether it’s mixed enough by turning off the mixer and pulling the paddle attachment up. If the peaks stand straight up or just bend a little at the top, it’s ready.
Now add a few drops (not a lot) of the pink food color gel and beat until the color is even. Use a spatula to scoop some of the icing into one of the piping bags, then twist the end of the bag and fasten with a rubber band. Test the icing on a plate or napkin to make sure it’s easy to pipe, then use the icing to outline all of the cookies.
Once all the cookies are outlined, add a few drops of water to the original bowl of icing and stir (you can scoop/squeeze extra outline icing back into the bowl if you’d like). Keep adding water a few drops at a time, stirring well after each addition, until the icing is still thick (about the consistency of maple syrup) but is spreadable.
Scoop some (about 1 1/2 cups is more than enough) of the icing into a small bowl and add a few drops more food coloring to it. Stir to combine, then spoon into the empty piping bag (be careful with this one, because the frosting may drip out if the bag is vertical).
Using a teaspoon (or even a 1/2 teaspoon), place a little of the thinned lighter pink frosting in the center of three or four cookies. Use the back of the spoon, a toothpick, a small paintbrush or whatever you have to spread the frosting out to the edges you outlined. Feel free to add more frosting to the cookie if it makes it easier to spread.
Once the cookies are covered with the light pink frosting, place a dot of the darker pink frosting in the center of each wet cookie. Use a toothpick to make the star design by gently dragging outward from the center.
Continue until all the cookies are decorated. Allow frosting to dry overnight.